Tampilkan postingan dengan label javascript. Tampilkan semua postingan

Rabu, 11 Maret 2015

Building a List/Grid View Switcher in Blogger with Auto Read More

A list of posts in grid or list view provides a more defined canvas with which a blogger or website owner can use as a guide in creating content. This concept has extended to visitors, where they can have control on whether or not they wish to view posts in list or grid view. While custom modification codes are shared by some blogging sites, others are not. Some that are shared, however, can be complex even to bloggers themselves, such as JQuery.

The good news is there are lightweight codes available, including the Auto Read More in Blogger. Through it, a blogger can add two buttons that will enable visitors to switch between grid view and list view, depending on what they prefer. These buttons, however, are only visible on limited pages - homepage, label page and archive page. Nonetheless, it is better than not having this particular feature at all.

Unlike JQuery, the Auto Read More uses HTML, CSS and JavaScript. To view posts in a list view, two sets of CSS codes are added as one. Another set is added to view posts in grid view. Other combination of codes is used to enable easy switch between views, particularly at a click of a button.


How to Add a List/Grid View Switcher in Blogger

Step 1. Log into your Blogger dashboard and select your blog, then go to "Template" > press the "Edit HTML" button.

Step 2. Click anywhere inside the code area and press the CTRL + F keys to open the search box. Type this tag below inside the box and hit Enter to find it:
</head>
Step 3. Just above the </head> tag, copy and paste the following CSS style and scripts:
<script type='text/javascript'>
function list_view(){
if(document.getElementsByClassName(&quot;post&quot;)) {elementArray = document.getElementsByClassName(&quot;post&quot;); while (elementArray.length) {elementArray[0].className = &quot;post-grid-view&quot;;}}
if(document.getElementsByClassName(&quot;post-title&quot;)) {elementArray = document.getElementsByClassName(&quot;post-title&quot;); while (elementArray.length) {elementArray[0].className = &quot;post-title-grid&quot;;}}
}
function grid_view(){
if(document.getElementsByClassName(&quot;post-grid-view&quot;)) {elementArray = document.getElementsByClassName(&quot;post-grid-view&quot;); while (elementArray.length) {elementArray[0].className = &quot;post&quot;;}}
if(document.getElementsByClassName(&quot;post-title-grid&quot;)) {elementArray = document.getElementsByClassName(&quot;post-title-grid&quot;); while (elementArray.length) {elementArray[0].className = &quot;post-title&quot;;}}
}
</script>
 <script type='text/javascript'>
posts_no_thumb_sum = 100;
posts_thumb_sum = 350;
</script>

<script type='text/javascript'>
//<![CDATA[
function removeHtmlTag(strx,chop){
if(strx.indexOf("<")!=-1)
{
var s = strx.split("<");
for(var i=0;i<s.length;i++){
if(s[i].indexOf(">")!=-1){
s[i] = s[i].substring(s[i].indexOf(">")+1,s[i].length);
}
}
strx = s.join("");
}
chop = (chop < strx.length-1) ? chop : strx.length-2;
while(strx.charAt(chop-1)!=' ' && strx.indexOf(' ',chop)!=-1) chop++;
strx = strx.substring(0,chop-1);
return strx+'...';
}
function createSummaryAndThumb(pID, pURL, pTITLE){
var div = document.getElementById(pID);
var imgtag = "";
var img = div.getElementsByTagName("img");
var summ = posts_no_thumb_sum;
if(img.length>=1) {
imgtag = '<span class="posts-thumb" style="float:left; margin-right: 10px;"><a href="'+ pURL +'"><img src="'+img[0].src+'" /></a></span>';
summ = posts_thumb_sum;
}

else {
imgtag = '<span class="posts-thumb" style="float:left; margin-right: 10px;"><a href="'+ pURL +'" title="'+ pTITLE+'"><img src="https://blogger.googleusercontent.com/img/b/R29vZ2xl/AVvXsEhfNylWAHDwV2rNMmj-Xmit_cW2xsZlW7QE9EmN4cZNKuvJQZ5MIyJILXidCatBE4DRc7LJDSRwqBk5-De_UvUPQ7YCAwQG-lnRw2vpB5B2MV0YtZHVu6bCADxz7UafMMf4CsJF2-1IIcVB/s1600/sorry-image-not-available.png" style="margin-top: -30px;" /></a></span>';
summ = posts_thumb_sum;
}

var summary = imgtag + '<a href="'+ pURL +'"><div class="post-summary-text">' + removeHtmlTag(div.innerHTML,summ) + '</div></a>';
div.innerHTML = summary;
}
//]]>
</script>

<b:if cond='data:blog.pageType != &quot;static_page&quot;'>
<b:if cond='data:blog.pageType!= &quot;item&quot;'>
<style>
#list-view-button {font-family: Verdana; text-align:left;cursor:pointer;font-size: 14px;border-bottom: 5px solid #eaeaea;text-decoration: none;}
#list-view-button a{text-decoration: none; color: #666;}
.grid-view-button {background-color:#efefef;color:#666;padding:5px 10px;border-radius: 5px;font-size: 12px;}
.list-view-button {background-color:#efefef;color:#000;padding:5px 10px;border-radius: 5px;font-size: 12px;}
.post-grid-view {width:100%;height:250px;overflow: hidden;float:left;margin:0px 0px 20px !important;position:relative;display: block; -webkit-transition:all 0.5s ease 0s; -moz-transition:all 0.5s ease 0s; -o-transition:all 0.5s ease 0s; transition:all 0.5s ease 0s; }
.post-grid-view .posts-thumb {width:40% !important;height:250px !important;float:left;margin:0px;position:relative;border-top: 0px solid transparent !important;overflow: hidden;}
.post-grid-view .post-header {display: none;}
.post-grid-view .post-body img {min-width: 300px !important; min-height: 250px !important;display:block;width:100%!important;height:auto!important;max-width:800px!important;max-height:400px!important;border:none;outline:none;position:relative;margin: 0px;padding:0;}
.post-grid-view .post-summary-text {opacity: 1; background: none; width: 58%;font-size: 120% !important;clear: none !important; display: inline-block !important; padding: 80px 0px !important; color: #666 !important; text-shadow: none !important; float: right !important; text-align: left; position: relative !important; font-family: &#39;Open Sans Condensed&#39;, sans-serif;}
.post-grid-view .post-body {height: 250px;background:#f5f5f5; box-shadow: none !important;}
.post-title-grid a { font-size:170%;color: #777;font-family: &#39;Open Sans Condensed&#39;, sans-serif;}
.post-title-grid { position: absolute; left: 42%; top: 5%; z-index: 1;}
.post-grid-view .post-footer {left: 41%; display:block;position: absolute; bottom: 2%;font-size: 120%; background: transparent !important; border: 0px solid transparent !important;font-family: &#39;Open Sans Condensed&#39;, sans-serif;}
.post-grid-view .post-footer a{color: #128EC9;}
.post-grid-view a.comment-bubble {display: none;}
.main-inner .column-center-inner .section {margin: 0px !important;}
.post { -webkit-transition:all 0.5s ease 0s; -moz-transition:all 0.5s ease 0s; -o-transition:all 0.5s ease 0s; transition:all 0.5s ease 0s;}

#blog-pager {clear:both;}
.post {height:auto;width:32.2%;display:inline-block;text-decoration:none;float:left;margin:0 1% 1% 0%;overflow: hidden;padding:0!important;}
.date-header {display: none;}
h3.post-title a {font-size:90%;font-family: &#39;Open Sans Condensed&#39;, sans-serif;text-transform:uppercase;color:#fff;text-shadow: 1px 1px 0 rgba(0, 0, 0, 0.1);font-weight: bold;}
h3.post-title {text-align: center; position:absolute;top:0;width:100%;overflow:hidden;margin:0px !important;padding-top: 30%; background-color: rgba(50, 126, 213, 0.8);transform: scale(1);opacity: 0;z-index: 10;height: 100%;transition: all 300ms ease-out 0s;}
h3.post-title:hover {opacity: 1;}
.posts-thumb {width:100%!important;height:200px!important;overflow:hidden;clear:both;}
.post-body {border-radius:2px;box-shadow:0 5px 4px 1px rgba(0,0,0,0.1);position:relative;overflow: hidden;}
.post-body a {text-decoration: none;}
.post-body img {display:block;width:100%!important;height:auto!important;max-width:800px!important;max-height:400px!important;min-width:200px!important;min-height:200px!important;border:none;outline:none;position:relative;margin: 0px;padding:0;}
.post-summary-text {display: none;}
a.comment-bubble {color:#fff;text-decoration:none;font-size:100%;width: 100%;text-align: center;position:absolute;top:175px;left: 0px;text-shadow:1px 2px 1px #333;font-family: &#39;Pacifico&#39;, cursive;z-index: 122;}
a.comment-bubble:before { content: &quot;Comments: &quot; url(https://blogger.googleusercontent.com/img/b/R29vZ2xl/AVvXsEgkVKxMjf6WWhYqgB1kPQzYo3o2dTuDEpFk51FBittMkaxwtDxheJwCaNe9aAY84SAqTBmMXElYy5zAngIfds64jBYX5kDdGVe_hAczNkCb4-zbXQDE_4r3SHDFHCJ95xujB3xvbtl8if1Y/s1600/heart-active.png);}
.post-header,.post-footer {display:none;}
</style></b:if></b:if>
<link href='http://fonts.googleapis.com/css?family=Open+Sans+Condensed:300' rel='stylesheet' type='text/css'/>
<link href='http://fonts.googleapis.com/css?family=Pacifico' rel='stylesheet' type='text/css'/>

Step 4. Next, search for the following line:
<b:section class='main' id='main' showaddelement='no'>
...in case you can't find it, search for this one instead:
<b:section class='main' id='main' showaddelement='yes'>
Step 5. Just above this line, add the following code:
<b:if cond='data:blog.pageType != &quot;static_page&quot;'>
<b:if cond='data:blog.pageType!= &quot;item&quot;'>
<div id='list-view-button'><a class='grid-view-button' onclick='grid_view()'><img src='https://blogger.googleusercontent.com/img/b/R29vZ2xl/AVvXsEgMfN90Ta-InFeNKvU_MXO9ewZ2mkMgcwJLLdhMMeeUyAK1rcHJi5QM0KAii4-EJVeSs5MCi7rksDLORVxPCu5rxcVFWtCPlHo8bn3UqrxXqnY8-Ez99esalt2wRXit3IwbPkSDGe_kz0zE/s1600/search-grid-icon.png' style='margin: -8px 1px -3px -6px;width: 16px;'/> Grid View</a> <a class='list-view-button' onclick='list_view()'><img src='https://blogger.googleusercontent.com/img/b/R29vZ2xl/AVvXsEjylBB-JwzFMbBcjgC9Ws68JNJ1yFhY9ZhJs_4pF78aI14rc_m0ulgPqnZB986aFarfU6MCA4pkN0fybIqLYL1YQ2nx4eoqrSvCBwLDlXKfQGXu27q16QpgXUZ1w9bT0YC44U6Ljxa-XP5e/s1600/icon-list-view.png' style='margin: -8px 1px -3px -6px;width: 16px;'/> List View</a></div>
</b:if></b:if>
Step 6. Now, search the code below:
<data:post.body/>
Step 7. You will find 3 occurrences of this code, replace only the second and third one with this one below:
 <b:if cond='data:blog.pageType != &quot;static_page&quot;'>
    <b:if cond='data:blog.pageType != &quot;item&quot;'>
        <div expr:id='&quot;summary&quot; + data:post.id'>
            <data:post.body/>
        </div>
        <script type='text/javascript'>createSummaryAndThumb(&quot;summary<data:post.id/>&quot;,&quot;<data:post.url/>&quot;);</script>
        <b:if cond='data:post.allowComments'>
            <a class='comment-bubble' expr:href='data:post.addCommentUrl' expr:onclick='data:post.addCommentOnclick'>
                <data:post.numComments/>
            </a>
        </b:if>
    </b:if>
</b:if>
<b:if cond='data:blog.pageType == &quot;item&quot;'>
    <data:post.body/>
</b:if>
<b:if cond='data:blog.pageType == &quot;static_page&quot;'>
    <data:post.body/>
</b:if>
Important: if you already added the auto read more script, remove the previous one in order to make this work.

Step 8. Finally, click "Preview" to see if everything looks good and press the 'Save Template' button to save the changes...

That's it!

Adding a dynamic view switcher on a blog will make viewing content a lot easier for visitors. Whether using a list or grid view, a more compressed list of posts will eliminate the need to click on the next page, which could take time if loading takes a while to complete. For a blog archive, using the Auto Read More codes in Blogger will surely make everyone's viewing experience very convenient.

Considering the ease with which the codes can be customized, building a list/grid view switcher would be completed in no time. A real bonus is that Auto Read More works on all platforms, with cross-browser support as well.

Kamis, 05 Maret 2015

Add Masonry, Grid Layouts to Blogger Posts with CSS and Javascript

How a website's content is displayed can spell the difference between being popular and obscure. Anything that looks chaotic or hardly readable is never going to be anyone's favorite. This is why content must be displayed in an organized, easy to follow and straightforward manner. Nothing works better than a structured grid, in this case.

Posts listed in grid view provide an excellent viewing experience for both the blogger or website owner and the visitors. This is especially true if the grid comes with images that would play with a person's visual inclination. What is great about grids is the seamless and smooth layout, complemented with a structured yet simple architecture. This makes it easier to navigate through a blog archive or product page. The style also enables a website owner to present posts in a more artistic and informative manner, without delving into the details. Suffice to say that a grid view demands creativity to be effortlessly mixed with functionality.

How views can be switched depends on a number of changes in a blog's codes. Some are fairly easy to implement, while others can be a little complex. Not to worry, as there are guides that will be provided. Grid styles also come in huge varieties, with each one designed to cater to a specific audience. Now, are you ready to go on the grid?

Features

What features can you expect from a grid style post in Blogger?

  • All the posts will follow the grid style when switching to grid view.
  • While the codes are being customized, the posts are left untouched. Their length, however, could be changed accordingly.
  • Auto Read More will be applied on all posts.
  • Thumbnails are automatically added based on the first picture found in each post.
  • Code is secure and is used across the board. In fact, 99% of bloggers are using a similar code to enable grid style posts in blogger.

What are the benefits of grid style?

  • Quick loading time of posts. Since only the snippets are loaded in certain pages, or a thumbnail and a caption, pulling up a blog archive would be quicker. When loading time is decreased, user experience is greatly enhanced.
  • Professional-looking blog. Without the chaos and concerns on readability, a website can look really clean and professional. Combined with the right colors and images, it can also leave a visual impact.
  • Improved website ranking. Because visitors have to click in order to view the rest of the post, page views of a site will significantly increase. This makes for a better SEO strategy.

Although changes to the CSS codes have to be made to implement the grid style view and make it compatible with a blog's template, all the work will be worth it once it is up and running.

Important:
Before anything make sure that you backup your Blogger template! If have encounter any problems with your edits, you can revert the template back to its previous condition by restoring it from your backup. For this, go to 'Template' in the left menu > click on the 'Backup/Restore' button in the upper right corner and press the 'Download Full Template' button - choose where you want to save the file on your computer and click the 'Save' button.

Now we can safely proceed with editing our Blogger template. If you run into problems, just revert back to your saved template.

How to Create Masonry, Grid Style Posts in Blogger

Step 1. Log into your Blogger dashboard and click on the blog where you want to apply the grid style.
Step 2. Go to "Template" located on the left side of the screen and press the "Edit HTML" button.
Step 3. Click anywhere inside the code area and press the CTRL+F keys to open the search box, then type the following tag inside the box (hit Enter to find it):
</head>
Step 4. Now copy the script below and paste it just before the </head> tag:
<script type='text/javascript'>
posts_no_thumb_sum = 100;
posts_thumb_sum = 100;
</script>

<script type='text/javascript'>
//<![CDATA[
function removeHtmlTag(strx,chop){
if(strx.indexOf("<")!=-1)
{
var s = strx.split("<");
for(var i=0;i<s.length;i++){
if(s[i].indexOf(">")!=-1){
s[i] = s[i].substring(s[i].indexOf(">")+1,s[i].length);
}
}
strx = s.join("");
}
chop = (chop < strx.length-1) ? chop : strx.length-2;
while(strx.charAt(chop-1)!=' ' && strx.indexOf(' ',chop)!=-1) chop++;
strx = strx.substring(0,chop-1);
return strx+'...';
}
function createSummaryAndThumb(pID, pURL, pTITLE){
var div = document.getElementById(pID);
var imgtag = "";
var img = div.getElementsByTagName("img");
var summ = posts_no_thumb_sum;
if(img.length>=1) {
imgtag = '<span class="posts-thumb" style="float:left; margin-right: 10px;"><a href="'+ pURL +'"><img src="'+img[0].src+'" /></a></span>';
summ = posts_thumb_sum;
}

else {
imgtag = '<span class="posts-thumb" style="float:left; margin-right: 10px;"><a href="'+ pURL +'" title="'+ pTITLE+'"><img src="https://blogger.googleusercontent.com/img/b/R29vZ2xl/AVvXsEhfNylWAHDwV2rNMmj-Xmit_cW2xsZlW7QE9EmN4cZNKuvJQZ5MIyJILXidCatBE4DRc7LJDSRwqBk5-De_UvUPQ7YCAwQG-lnRw2vpB5B2MV0YtZHVu6bCADxz7UafMMf4CsJF2-1IIcVB/s1600/sorry-image-not-available.png" style="margin-top: -30px;" /></a></span>';
summ = posts_thumb_sum;
}

var summary = imgtag + '<a href="'+ pURL +'"><div class="post-summary-text">' + removeHtmlTag(div.innerHTML,summ) + '</div></a>';
div.innerHTML = summary;
}
//]]>
</script>
Step 5. Find the following code snippet using CTRL+F or Command + F:
<data:post.body/>
Step 6. After pressing the "Enter" key on your keyboard, you may find three occurrences of the above code, replace only the second and the third one with this code below:
<b:if cond='data:blog.pageType != &quot;static_page&quot;'>
    <b:if cond='data:blog.pageType != &quot;item&quot;'>
        <div expr:id='&quot;summary&quot; + data:post.id'>
            <data:post.body/>
        </div>
        <script type='text/javascript'>createSummaryAndThumb(&quot;summary<data:post.id/>&quot;,&quot;<data:post.url/>&quot;);</script>
        <b:if cond='data:post.allowComments'>
            <a class='comment-bubble' expr:href='data:post.addCommentUrl' expr:onclick='data:post.addCommentOnclick'>
                <data:post.numComments/>
            </a>
        </b:if>
    </b:if>
</b:if>
<b:if cond='data:blog.pageType == &quot;item&quot;'>
    <data:post.body/>
</b:if>
<b:if cond='data:blog.pageType == &quot;static_page&quot;'>
    <data:post.body/>
</b:if>

Step 7. Now choose one of the styles below, copy the code provided and paste it just above the </head> tag:

Simple Grid Design


<b:if cond='data:blog.pageType != &quot;static_page&quot;'>
<b:if cond='data:blog.pageType!= &quot;item&quot;'>
<style>
#blog-pager {
clear:both;
}
.post {
height: auto;
width:30.8%;
overflow: hidden;
display:inline-block;
text-decoration:none;
float:left;
margin:0 1.1% 2%;
padding: 0px !important;
}

h3.post-title a {
font-size:75%;
font-family: &#39;Open Sans Condensed&#39;, sans-serif;
text-transform:uppercase;
padding:0;
color:#444;
}
h3.post-title {
height: 26px;
text-align:center;
width:100%;
margin:0!important;
padding-bottom: 4%;
}
.date-header {
display: none;
}

.post-body a {
text-decoration: none;
}
.posts-thumb {
width:100%!important;
height:190px!important;
overflow:hidden;
clear:both;
}
.post-body img {
display:block;
width:100%!important;
height:auto!important;
max-width:800px!important;
max-height:400px!important;
min-width:190px!important;
min-height:190px!important;
border:none;
outline:none;
position:relative;
margin: 0px;
padding:0;
}
.post-summary-text {
color:#777;
font-size:100%!important;
font-family: &#39;Open Sans Condensed&#39;, sans-serif;
text-align:center;
clear:both;
overflow:hidden;
margin:5px 0 0;
padding:7% 10%;
}
a.comment-bubble {
color:#fff;
text-decoration:none;
font-size:100%;
font-weight: bold;
right:10px;
position:absolute;
top:165px;
text-shadow:1px 2px 1px #333;
font-family: &#39;Open Sans Condensed&#39;, sans-serif;
}
a.comment-bubble:before {
content: &quot;Comments: &quot;;
}
.post-header,.post-footer {
display:none;
}
</style></b:if></b:if>

<link href='http://fonts.googleapis.com/css?family=Open+Sans+Condensed:300' rel='stylesheet' type='text/css'/>

Grid Layout with Post Summary and Thumbnail

grid layout for blogger


<b:if cond='data:blog.pageType != &quot;static_page&quot;'>
<b:if cond='data:blog.pageType!= &quot;item&quot;'>
<style>
#blog-pager {
clear:both;
}
.post {
height:auto;
width:31%;
display:inline-block;
text-decoration:none;
float:left;
margin:0 1.1% 2%;
padding:0!important;
}
h3.post-title a {
font-size:75%;
font-family: &#39;Open Sans Condensed&#39;, sans-serif;
text-transform:uppercase;
color:#111;
padding:0;
}
h3.post-title {
text-align:center;
height:22px;
position:absolute;
bottom:23%;
width:100%;
z-index:101;
overflow:hidden;
margin:0!important;
padding:10px 0;
}
.date-header {
visibility:hidden;
height:0!important;
width:0!important;
margin:0!important;
padding:0!important;
}
.posts-thumb {
width:100%!important;
height:190px!important;
overflow:hidden;
clear:both;
border-bottom:3px solid #00C8BD;
border-top:3px solid #558ABB;
}
.posts-thumb:hover {
border-top:3px solid #FF664E;
border-bottom:3px solid #FEBE36;
}
.post-body {
border-radius:2px;
box-shadow:0 0 6px 1px rgba(0,0,0,0.1);
position:relative;
height:auto;
}
.post-body a {
text-decoration: none;
}
.post-body img {
display:block;
width:100%!important;
height:auto!important;
max-width:800px!important;
max-height:400px!important;
min-width:190px!important;
min-height:190px!important;
border:none;
outline:none;
position:relative;
margin: 0px;
padding:0;
}
.post-summary-text {
color:#555;
background:#f5f5f5 url(https://blogger.googleusercontent.com/img/b/R29vZ2xl/AVvXsEiW5rlSRL9pVAFUZWVAuNqm1EQlFumSwVYmt9U4vQT8GzMvOHxK8wRoYVVgZM87j2YAzDIp8u3Qfen3xO1dge3t6LSUYqDQdu9FDYz4L7GavvSLqhyphenhyphenHmXLqq3jgIeReqk8_sjxNhyphenhyphenwFwboV/s1600/blueprint.png);
font-size:100%!important;
font-family: &#39;Open Sans Condensed&#39;, sans-serif;
text-align:center;
clear:both;
overflow:hidden;
margin:5px 0 0;
padding:17% 10% 6%;
}
a.comment-bubble {
color:#fff;
text-decoration:none;
font-size:110%;
right:10px;
position:absolute;
top:165px;
text-shadow:1px 2px 1px #333;
font-family: &#39;Pacifico&#39;, cursive;
}
a.comment-bubble:before {
content: &quot;Comments: &quot; url(https://blogger.googleusercontent.com/img/b/R29vZ2xl/AVvXsEgkVKxMjf6WWhYqgB1kPQzYo3o2dTuDEpFk51FBittMkaxwtDxheJwCaNe9aAY84SAqTBmMXElYy5zAngIfds64jBYX5kDdGVe_hAczNkCb4-zbXQDE_4r3SHDFHCJ95xujB3xvbtl8if1Y/s1600/heart-active.png);
}
.post-header,.post-footer {
display:none;
}
</style></b:if></b:if>

<link href='http://fonts.googleapis.com/css?family=Open+Sans+Condensed:300' rel='stylesheet' type='text/css'/>
<link href='http://fonts.googleapis.com/css?family=Pacifico' rel='stylesheet' type='text/css'/>

Grid Layout with Text Snippet on Hover

blogger posts


<b:if cond='data:blog.pageType != &quot;static_page&quot;'>
<b:if cond='data:blog.pageType!= &quot;item&quot;'>
<style>
#blog-pager {
clear:both;
}
.post {
height:auto;
width:31%;
display:inline-block;
text-decoration:none;
float:left;
margin:0 1.1% 2%;
padding:0!important;
}
h3.post-title a {
font-size:95%;
font-family: &#39;Open Sans Condensed&#39;, sans-serif;
text-transform:uppercase;
color:#fff;
padding:0;
text-shadow: 2px 2px 3px #222;
}
h3.post-title {
height: 22px;
text-align:center;
position:absolute;
top:1%;
width:100%;
z-index:101;
overflow:hidden;
margin:0!important;
padding:10px 0;
}
.date-header {
visibility:hidden;
height:0!important;
width:0!important;
margin:0!important;
padding:0!important;
}
.posts-thumb {
width:100%!important;
height:190px!important;
overflow:hidden;
clear:both;
}
.post-body {
border-radius:2px;
box-shadow:0 5px 4px 1px rgba(0,0,0,0.1);
position:relative;
overflow: hidden;
}
.post-body a {
text-decoration: none;
}
.post-body img {
display:block;
width:100%!important;
height:auto!important;
max-width:800px!important;
max-height:400px!important;
min-width:190px!important;
min-height:190px!important;
border:none;
outline:none;
position:relative;
margin: 0px;
padding:0;
}
.post-summary-text {
cursor: pointer;
background-color: rgba(44, 77, 163, 0.8);
color:#fff;
font-size:120%!important;
font-family: &#39;Open Sans Condensed&#39;, sans-serif;
clear:both;
overflow:hidden;
padding:25% 10% 0%;
left: 0;
position: absolute;
text-align: center;
vertical-align: bottom;
text-shadow: 1px 1px 0 rgba(0, 0, 0, 0.1);
top: 0;
transform: scale(1);
opacity: 0;
z-index: 10;
height: 100%;
transition: all 300ms ease-out 0s;
}
.post-summary-text:hover {
opacity: 1;
}
a.comment-bubble {
color:#fff;
text-decoration:none;
font-size:100%;
width: 100%;
text-align: center;
position:absolute;
top:165px;
left: 0px;
text-shadow:1px 2px 1px #333;
font-family: &#39;Pacifico&#39;, cursive;
z-index: 122;
}
a.comment-bubble:before {
content: &quot;Comments: &quot;;
}
.post-header,.post-footer {
display:none;
}
</style></b:if></b:if>
<link href='http://fonts.googleapis.com/css?family=Open+Sans+Condensed:300' rel='stylesheet' type='text/css'/>
<link href='http://fonts.googleapis.com/css?family=Pacifico' rel='stylesheet' type='text/css'/>

Masonry Layout (Pinterest Like Grid)

masonry layout for blogger


<b:if cond='data:blog.pageType != &quot;static_page&quot;'>
<b:if cond='data:blog.pageType!= &quot;item&quot;'>
<style>
#blog-pager {
clear: both;
position: absolute;
bottom: 0px;
left: 0px;
}
.blog-feeds {
display: none;
}
.post {
height: auto;
width: 100%;
padding: 0px !important;
margin: 0px 0px 30px;
display: inline-block;
text-decoration: none;
}
h3.post-title a{
font-size: 95%;
font-family: &#39;Open Sans Condensed&#39;, sans-serif;
text-transform: uppercase;
padding: 0px;
color: #fff;
text-shadow: 3px 2px 2px #222;
font-weight: bold;
}
h3.post-title, .comments h4 {
margin: 0px !important;
text-align: center;
padding: 10px 0px;
position: absolute;
top: 10px;
width: 100%;
z-index: 200;
}
.post-header {
display: none;
}
.date-header {
visibility: hidden;
height: 0px !important;
width: 0px !important;
padding: 0px !important;
margin: 0px !important;
}
.posts-thumb {
width: 100%;
height: auto;
overflow: hidden;
clear: both;
}
.post-body {
overflow: hidden;
position:relative;     
}
.post-body a {
text-decoration: none;
}
.post-body img {
display: block;
width: auto;
height: auto;
max-width: 100%;
max-height: none;
min-width: 100%;
min-height: auto;
margin: 0px;
padding: 0;
border: none;
outline: none;
position: relative;
}
.post-summary-text {
cursor: pointer;
background-color: rgba(44, 77, 163, 0.8);
color:#fff;
font-size:120%!important;
font-family: &#39;Open Sans Condensed&#39;, sans-serif;
clear:both;
overflow:hidden;
padding:25% 10% 0%;
left: 0;
position: absolute;
text-align: center;
vertical-align: bottom;
text-shadow: 1px 1px 0 rgba(0, 0, 0, 0.1);
top: 0;
transform: scale(1);
opacity: 0;
z-index: 10;
height: 100%;
transition: all 300ms ease-out 0s;
}
.post-summary-text:hover {
opacity: 1;
}
.post-footer {
display: none;
}
a.comment-bubble {
color: #fff;
text-decoration: none;
font-size: 120%;
right: 5px;
z-index: 222;
position: absolute;
top: 5px;
text-shadow: 1px 2px 1px #333;
font-family: &#39;Open Sans Condensed&#39;, sans-serif;
}
a.comment-bubble:before {
content: url(https://blogger.googleusercontent.com/img/b/R29vZ2xl/AVvXsEgkVKxMjf6WWhYqgB1kPQzYo3o2dTuDEpFk51FBittMkaxwtDxheJwCaNe9aAY84SAqTBmMXElYy5zAngIfds64jBYX5kDdGVe_hAczNkCb4-zbXQDE_4r3SHDFHCJ95xujB3xvbtl8if1Y/s1600/heart-active.png);
}
.main-inner .column-center-inner {
-moz-column-count: 3;
-moz-column-gap: 1px;
-webkit-column-count: 3;
-webkit-column-gap: 1px;
column-count: 3;
column-gap: 1px;
width: 100%;
padding: 0px !important;
}
</style></b:if></b:if>

<link href='http://fonts.googleapis.com/css?family=Open+Sans+Condensed:300' rel='stylesheet' type='text/css'/>

Please note that the masonry layout might not work if you have a customized template, also older posts will appear vertically (from top to bottom) instead of left to right.

Step 8. Click "Preview" and if everything looks fine, press the "Save Template" button.


That's it!

Implementing a grid style view has its pros and cons, but the benefits clearly outweigh the disadvantages. The fact that a website will look visually appealing and professional when set in grid style, is already enough to boost its online reputation. An increase in page views is just the beginning. With the right images and content, a blog will also have better SEO. Most importantly, implementing the changes is not as complex as some might think. With a step-by-step guide available, adding a dynamic view switcher would be completed in no time.

Kamis, 04 September 2014

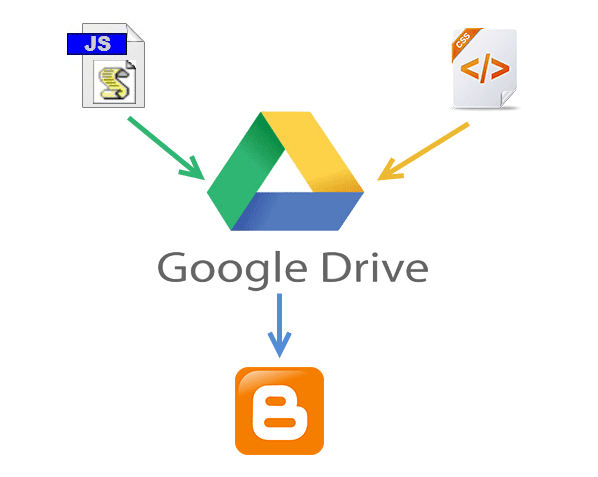
How To Host Blogger CSS and JavaScript Files in Google Drive

Anyone that has ever worked on a web design or development can tell you that where you decide to store your files is important. Every time someone visits your site, the server or host will access this location and bring up the relevant files that need to be displayed. Wherever you decide to store your files, this will have an impact on some important aspects like the speed that your site loads, your overall SEO ranking and your ability to make necessary adjustments to the site.

Things To Think About

When you are designing your online structure and where to store your important CSS and JavaScript files, here is a run down on how this decision might impact your site later on:

Site Loading Speed

By combining some of the style sheets and website files, the Blogger server only has to collect information from a single location. When you split up your files or decentralize the file system, it takes a longer time for all the data to come together to make your site possible.

Slow loading speeds can negatively impact your SEO ratings because the slower the site is, the less likely that visitors are going to wait around for it to load. If someone visits your site and immediately clicks the 'back' button because it's taking too long to load, that is going to increase your bounce rate and provide Google with statistics that show your site is either low quality or irrelevant to the search keywords.

File Storage Affects SEO

In addition to increasing your bounce rate, storing your files in a central location and managing the name of your files can affect SEO site wide. Web crawlers enlisted by Google, or some of the other search engines, index both the code on your site, and the name and directory of your files. If file names are random or not placed in the proper categories, the web crawlers aren't going to know what to do with the information.

Clear file structure and a central location provide you with incentive to organize everything and name them appropriately. All the content that is relevant to the subject of your website or blog will be in the same location for web crawlers to review.

Storage Locations Affect Editing Abilities

Shuffling through files and folders or opening up FTP connections just to make some simple edits can be a hassle, and take up a lot of time that could have otherwise have been spent writing new content.

If you're a Blogger site owner, this is something you need to think about. When you need to make alterations to things like social media sharing buttons, popular posts, recent posts and related posts widgets, you have to know where everything is intended to go, or risk losing both available content and money.

Some of the larger sites that produce hundreds of unique articles each month can't afford to have content in different locations. When articles start to get lost out of order, they run the risk of duplicating content on their site, or forgetting to post it altogether. Things should be right at your fingertips to minimize mistakes and reduce the amount of time spent editing the site while it's still live.

Storing Javascript/CSS Files With Google Drive

Storing Blogger CSS and JavaScript files with Google Drive will help to eliminate any of the problems mentioned above and reduce the clutter among your services. Taking this method can increase your site speed, increase the opportunities for a successful SEO campaign, and make your life so much easier.

Google Drive provides ample amount of space to store large files, and offers collaboration services so that you can work among different team members on the same project. Some of the files that you upload into the cloud services can remain unpublished and stay within the private site, whereas other files like blog posts can be published or stored to the public site.

Another beneficial feature of storing all your Blogger files on Google Drive is that it is highly secure. Google comes with the backing of one of the leading companies in the technical world so that you can be sure your content is safe from hackers and those looking to compromise your site.

This guide will provide you with step-by-step instructions on how to setup your Blogger site using Google Drive. It's completely free to take advantage of this strategy, and will provide you with a solid platform from which to build your blog.
host blogger css javascript files

Step 1. Prepare the CSS/JavaScript Files

  • First, we need to create the file that we need to host. To host a CSS file, open the Notepad and paste the CSS code (if it is enclosed within the <style> and </style> tags, remove them). 

  • In the Notepad menu, select 'File' > 'Save as' and type the file name with the .css extension just like I did with mycssfile.css - see the screenshot below.
create a css file
  • In the same window, choose "All files" in the "Save as type" option and set the Character Encoding to UTF-8. 

  • If you want to host a JavaScript file, add the .js extension (instead of .css) at the end of your file name (remove the <script>...</script> tags if you see them). Click "Save" and navigate to the location where you want to save the file. 

Step 2. Upload Your File on Google Drive

  • Access https://drive.google.com and log in with your Gmail account. After you logged in, click on the 'Create' button and add a new separate folder to upload your JavaScript and CSS files.

create folder in Google drive
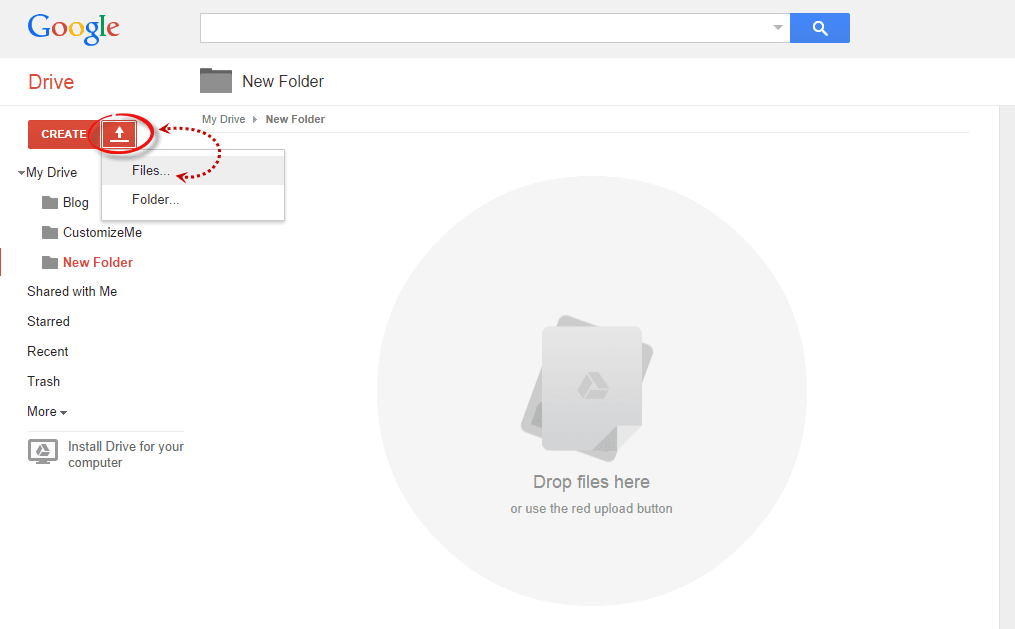
  • Open the newly created folder, and click on the Upload button with the upward arrow to choose the files that you need to upload.

upload files using google drive
  • Now, navigate to the location where you saved the files, select them (to select multiple files, press and hold down the Ctrl key on your keyboard and then click on them) and press the Open button.
  • After the files have been successfully uploaded, right click on the file names (to select all your files in the folder, click on the checkbox) and select 'Share':

share google drive files
  • In the 'Sharing settings' window, click on the 'Change' link and choose the 'Public on the web' option. Press 'Save' and copy the link(s) of your uploaded file(s) from the 'Links to share' box highlighted in blue, then paste it into a Notepad to use it later.

javascript css file sharing

Step 3. How to Add an External CSS/JavaScript file to Blogger

Before you can use the links, you must replace 'https://drive.google.com/file/d' to 'https://googledrive.com/host' and remove '/edit?usp=sharing' in the link.

For example, the link to mycssfile.css that I copied looks like this:
https://drive.google.com/file/d/0B4n9GL3eVuV-TkphMkc3SFR2Slk/edit?usp=sharing
Notice the part in blue after the "/file/d/" part. That is the file ID which is used to access it via the new hosting service. It should start with the following URL:
https://googledrive.com/host/
Add the file ID like this (remove the '/edit?usp=sharing' part):
https://googledrive.com/host/0B4n9GL3eVuV-TkphMkc3SFR2Slk
Now log into your Blogger account, select your blog and go to Template > Edit HTML. Click anywhere inside the code area and press the CTRL + F keys to open the search box:

open blogger search box

If you want to add a CSS file, type the following tag inside the search box and hit Enter to find it:
<head>
Just BELOW the <head> tag, add this line:
<link rel="stylesheet" type="text/css" href="https://googledrive.com/host/0B4n9GL3eVuV-TkphMkc3SFR2Slk" />
And replace https://googledrive.com/host/0B4n9GL3eVuV-TkphMkc3SFR2Slk with the link of your CSS file:

add external css to blogger

If you want to add a Javascript file, search for the following tag:
</body>
And add this line just ABOVE it:
<script src='https://googledrive.com/host/0B4n9GL3eVuV-eVYwLXBrTlZrVDg' type='text/javascript'></script>
Replace the line in blue with your URL:

add external javascript js to blogger

Finally, press the 'Save template' button to save the changes. And you're done!

In Conclusion

Once you have successfully saved all your file folders and closed out of the drive. Open your site in a browser and make sure that all the changes have completed successfully.

Next time you want to edit any of the information or move internal files, all you have to do is open up the Google Drive folder on your account and make the modifications from that location. Those files will then automatically sync to the online folder and make updates to your site. This works the same if you want to change the appearance by modifying the CSS code to extend the header, footer, or make customizations.

As you can see, changing your file storage out so that is CSS and JavaScript is stored on your Google Drive account is easy to do and only takes a few minutes. After you make the change, you can begin benefiting from faster loading speeds, higher SEO rankings, and overall a more convenient platform to work from to increase the efficiency of your work.

Jumat, 02 Mei 2014

Display Blogger Posts in Grid View with Thumbnails

Grid View with Thumbnails is a script for self-hosted Blogger blogs which will display blog posts as a thumbnail grid of images in homepage and archive pages. Instead of sending your blog visitors to a page that displays all the posts in full length with a large image which takes up too much space and requires too much scrolling, now you could have a clean page that displays a gallery grid, with thumbnails and post titles, linking back to the source post for that thumbnail. Let's take a look at what it could look like in this demo blog.

grid view on blogger posts

If you have a wallpaper or photo blog that would benefit from displaying a thumbnail grid style layout, look no further. Here's how you can add Grid (gallery) View to Blogger posts.

Adding Grid (Gallery) View to Blogger Posts


Step 1. Log in to your Blogger account and go to Template > click on the Edit HTML button

blogger template html

Step 2. Click anywhere inside the code area and press the CTRL + F keys to open the search box


Step 3. Type </head> inside the search box and hit Enter to find it.

Step 4. Just above the </head> tag, add the following script and style:
<script src="http://code.jquery.com/jquery-1.9.1.js"></script>
<script src="http://code.jquery.com/jquery-migrate-1.1.0.js"></script>

<b:if cond='data:blog.pageType == &quot;index&quot;'>
<script type='text/javascript'>//<![CDATA[
$(document).ready(function() {

    var width = 200;
    var height = 170;
    var placeholder = 'https://blogger.googleusercontent.com/img/b/R29vZ2xl/AVvXsEiPJZrBjnLb6E8FNXyO-Vo8BaO0cwUL39s2qrOab3Em-hai68TbrfIKLIacu9bE8dej6b3x0hkhOAaq4zpep_KT1TlqdLDaAJVPAdpVUqUkrNdo3emOAlyO0GLsENY1yUKrJ_qLRWEix64/s1600/no-thumb.png';
    var margins = "0px 0px 10px 10px";
    var fitThumb = 1;
    var titleTopPadding = 5;
    var titleBottomPadding = 8;
    var titleLeftRightPadding = 5;

    var titlePadding = titleTopPadding + 'px ' + titleLeftRightPadding + 'px ' + titleBottomPadding + 'px ' + titleLeftRightPadding + 'px';
    $('.post-body').each(function(n, wrapper) {
        var wrapper = $(wrapper);
        var image = $(wrapper).find('img').first();
        var link = wrapper.parent().find('h3 a');
        var linkURL = link.attr('href');
        var linkTitle = link.text();

        $(link).remove();
        wrapper.empty();

        if (image.attr('src')) {
            var thumbHeight = image.attr('height');
            var thumbWidth = image.attr('width');
            var thumbParent = $(image).parent();

            wrapper.append(thumbParent);

            if (fitThumb) {
                image.attr({
                    src: image.attr('src').replace(/s\B\d{3,4}/, 's' + width + '-c')
                    });
                image.attr('width', width).attr('height', height);
            } else {
                image.attr({
                    src: image.attr('src').replace(/s\B\d{3,4}/, 's' + width)
                    });
                image.attr('width', width);
                var changeHeight = (thumbHeight / thumbWidth * width).toFixed(0);
                image.attr('height', changeHeight);
            }

        } else {
            var image = $('<img>').attr('src', placeholder).attr('height', height).attr('width', width);
            var thumbParent = $('<a>').append(image).appendTo(wrapper);
        }

        thumbParent.attr('href', linkURL).css('clear', 'none').css('margin-left', '0').css('margin-right', '0').addClass('postThumbnail');

        var thumbTitle = $('<div>').prepend(linkTitle).css('padding', titlePadding).css('opacity', '0.9').css('filter', 'alpha(opacity=0.9)').css('width', width).appendTo(thumbParent);
        var ptitleHeight = thumbTitle.height();
        var summary = parseInt(ptitleHeight) + parseInt(titleTopPadding) + parseInt(titleBottomPadding);
        thumbTitle.css('margin-top', '-' + summary + 'px');
        wrapper.css('float', 'left').css('height', height).css('width', width).css('margin', margins).css('overflow', 'hidden');
    });
    $('#blog-pager').css('clear', 'both');
});

function hideLightbox() {
    var images = document.getElementsByTagName('img');
    for (var i = 0; i < images.length;++i) {
        images[i].onmouseover = function() {
            var html = this.parentNode.innerHTML;
            this.parentNode.innerHTML = html;
            this.onmouseover = null;
        };
    }
}

if (window.addEventListener) {
    window.addEventListener('load', hideLightbox, undefined);
} else {
    window.attachEvent('onload', hideLightbox);
}
//]]>
</script>
<style>
.post {
    border-bottom: 0 dotted #E6E6E6;
    margin-bottom: 0;
    padding-bottom: 0;
}

h2,.post-footer {
    display: none;
}

a.postThumbnail div {
    text-decoration: none;
    color: #fff;
    font-size: 12px;
    font-weight: bold;
    text-transform: capitalize;
    background: rgb(125,126,125);
 /* Old browsers */
    background: -moz-linear-gradient(top,  rgba(125,126,125,1) 0%, rgba(14,14,14,1) 100%);
    background: -webkit-gradient(linear, left top, left bottom, color-stop(0%,rgba(125,126,125,1)), color-stop(100%,rgba(14,14,14,1)));
 /* Chrome,Safari4+ */
    background: -webkit-linear-gradient(top,  rgba(125,126,125,1) 0%,rgba(14,14,14,1) 100%);
    background: -o-linear-gradient(top,  rgba(125,126,125,1) 0%,rgba(14,14,14,1) 100%);
    background: -ms-linear-gradient(top,  rgba(125,126,125,1) 0%,rgba(14,14,14,1) 100%);
    background: linear-gradient(to bottom,  rgba(125,126,125,1) 0%,rgba(14,14,14,1) 100%);
    filter: progid:DXImageTransform.Microsoft.gradient( startColorstr=&#39;
    #7d7e7d&#39;, endColorstr=&#39;#0e0e0e&#39;,GradientType=0 );
}

a.postThumbnail:hover div {
    display: block;
}

.post-body img {
    background-color: transparent;
    border: 1px solid transparent;
    padding: 0px;
    -webkit-border-radius: 12px;
    -moz-border-radius: 12px;
    border-radius: 12px;
    opacity: 1;
    transition: opacity .25s ease-in-out;
    -moz-transition: opacity .25s ease-in-out;
    -webkit-transition: opacity .25s ease-in-out;
}

.post-body img:hover {
    -ms-filter: &quot;
    progid: DXImageTransform.Microsoft.Alpha(Opacity=70)&quot;
    ;

filter: alpha(opacity=70);
    -moz-opacity: 0.7;
    -khtml-opacity: 0.7;
    opacity: 0.7;
}
</style>
</b:if>
Note:
- If you want to make the post thumbnails larger, modify the 200 (width) and 170 (height) values in blue
- To change the default thumbnail for when there are no images, replace the URL in red with your own.

Step 5. Click on the Save template button to save the changes and View your blog. Now you should have a nice grid view on your Blogger posts. Enjoy!

Rabu, 09 April 2014

Using HTML5 Web Worker: Introducing Multithreading in JavaScript

Problem with JavaScript is that it is single thread environment. Every thing we do in JavaScript is managed and calculated by single thread.

Sometimes it happen that you have some more computation intensive task and your webpage performance may degrade(e.g. UI animation or transition performance). In this case, To achieve Parallelism, you can use Worker interface to spawn a new thread in background to do complicated calculation.

Worker thread can not directly communicate with Main thread, that means you can not directly change the content of any element in webpage(i.e. Inside Worker thread you can not run document.getElementById("demo").innerHTML = "demo";. You can not even alert from worker).

When to use Web Worker?

In case if your webpage have some code that is always running in the background like sorting algorithms, finding new position for animation, sine-cosine calculation etc.

Creating new Web Worker

You can create a new Web Worker using Worker() Constructor with Script location as argument.

var worker = new Worker("test_worker.js");

Setting Listener on Worker Thread

You can set Listener on Worker to receive message from Worker thread as following:

worker.addEventListener('message', function(e) { //Your action code goes here //received dataa will be in e.data alert(e.data); }, false);

Third argument here is useCapture. You can Google it for more help. You can also set Listener as following:

worker.onmessage = function (e) { //Your action code goes here alert(e.data); }

You can use either of this way to set Listener on Worker

In "test_worker.js", you can set Listener to receiver message from Main Thread as following:

self.addEventListener('message', function(e) { //Your action code goes here i = i + 1; self.postMessage(i); }, false);

Same way you can also use following method:

var i = 0; self.onmessage = function (e) { //Your action code goes here i = i + 1; self.postMessage(i); }

Here, postMessage() method is used to send message from Worker thread to Main thread and vice versa.

You can terminate Worker Thread using terminate() method:

worker.terminate();

Combining all this together, you can write your Multithreaded code for your highly computation intensive task, Which in turn will improve performance of web application.

Liked What You Read? Take a Next Step. Share It (Click Below) !! Let Others Know.


Minggu, 09 Maret 2014

How to Use Cookies in Javascript

Each time we visit a website, cookies can be stored to 'remember' things that we do while browsing a page. This may happen, for example, when we visit a page where we have to login with an username and a password. In this case, after verifying that the login is correct, usually a cookie is recorded on our computer.

An example would be the popular page of Google. This search engine allows users to choose how many search results they want to see on each page. Thanks to a cookie, this configuration remains unchanged for each computer, even after rebooting several sessions. Despite this, it is good to remove them from time to time because, although, some will expire being erased automatically after a while, some of them will never do so.
cookies with javascript, blogger tricks

Like many other things, cookies may suffer a poor use and hence their bad reputation. For instance, some websites can store and study the browsing habits of a user without their knowledge. This is why most browsers already include a system to filter them and can decide if they will provide some privacy or not.

If you want to see a live example of how a cookie works, please visit this page and refresh it a few times. You should get an alert window telling you about how many times you visited the page.
(script source: javascriptkit.com)

There could be other ways to use cookies but a server could do this with JavaScript. Below we have a simple script that can be used as many times we want, even for different purposes. Basically, what the following script does is to create three functions: the first one is to set a cookie, the second one is to read it, and the last one is to erase it. We can apply it in Blogger by accessing the template HTML and add it just before the </head> tag:
<script type='text/javascript'>
//<![CDATA[

// Set cookie
function setCookie(name, value, expires, path, domain, secure) {
document.cookie = name + "=" + escape(value) +
((expires == null) ? "" : "; expires=" + expires.toGMTString()) +
((path == null) ? "" : "; path=" + path) +
((domain == null) ? "" : "; domain=" + domain) +
((secure == null) ? "" : "; secure");
}

// Read cookie
function getCookie(name){
var cname = name + "=";
var dc = document.cookie;
if (dc.length > 0) {
begin = dc.indexOf(cname);
if (begin != -1) {
begin += cname.length;
end = dc.indexOf(";", begin);
if (end == -1) end = dc.length;
return unescape(dc.substring(begin, end));
}
}
return null;
}

//delete cookie
function eraseCookie (name,path,domain) {
if (getCookie(name)) {
document.cookie = name + "=" +
((path == null) ? "" : "; path=" + path) +
((domain == null) ? "" : "; domain=" + domain) +
"; expires=Thu, 01-Jan-70 00:00:01 GMT";
}
}

//]]>
</script>
Once done, in order to set a cookie, we only need to put the name and the value in quotes when we call the function. Additionally, we will set the expiry date by getting the current Time (in milliseconds) and add the required number of minutes (in milliseconds):
var expiration = new Date();
expiration.setTime(expiration.getTime() + 10000); //Expire after 10 seconds
setCookie("cookiename","hello",expiration);
}
The above code sets a cookie called cookiename, with the hello value and set its expiry date to 10 seconds after it has been set (10000 milliseconds = 10 seconds). If we want to restore the value of this cookie, then we should use the second function with the cookie name:
var checkCookie = getCookie("cookiename");
By adding this code below <body>, we created a cookie with the value 'hello' which can be shown on the screen if we want to. The cookie will disappear after 10 seconds:
<script type='text/javascript'>
var expiration = new Date();
expiration.setTime(expiration.getTime() + 10000);
setCookie("cookiename","hello",expiration);
var checkCookie = getCookie("cookiename");
document.write(checkCookie);
</script>
The erase function is used in the same way as the one for reading just by clicking on the name of the cookie. The setCookie values for 'domain' and 'secure' are not utilized. Use 'domain' on the Javascript cookie if you are using it on a subdomain, where the cookie is set on the widgets subdomain, but you need it to be accessible over the whole yoursite.com domain.

The combination of these three functions will allow us to handle cookies for specific purposes, as we will see in the near future.

Minggu, 02 Februari 2014

How to Increase Thumbnail Resolution on Blogger

When we add a widget on Blogger, the thumbnails will keep a default size of 72 x 72px which might not look good if we try to make them bigger using only CSS. However, with a bit of JavaScript we'll be able to replace the thumbnail with the same image of higher resolution and this way, larger images will no longer appear blurry.

In this tutorial we will see how we can replace the default thumbnail size of the popular posts widget even though we can apply this trick on any of the blog widgets.


Changing the Thumbnail Size for the Popular Posts Widget

Step 1. First, let's add the Popular posts gadget by going to Layout > click on the Add a gadget link and select Popular Posts from the popup window.

adding popular posts gadget

Step 2. Next, go to Template > click on the Edit HTML button > click anywhere inside the code area and press CTRL + F keys to open the Blogger search box.

edit blogger template html

Step 3. Type or paste the following tag inside the search box then hit Enter to find it:
</head>
After you found the </head> tag, add this CSS above it:
<style type='text/css'>
.PopularPosts .item-thumbnail a {
clip: auto;
display: block;
height: 130px;
margin: 0 0px 5px;
overflow: hidden;
width: 210px;
border: 2px solid #EEEEEE;
border-radius: 20px;
}
.PopularPosts .item-thumbnail img {
position: relative;
top: -30px;
transition:all .2s linear;
 -o-transition:all .5s linear;
-moz-transition:all .2s linear;
-webkit-transition:all .2s linear;
}
.PopularPosts .item-thumbnail img:hover{
opacity:.6;
filter:alpha(opacity=60)
}
.PopularPosts .widget-content ul li {
background: #F9F9F9;
border: 2px solid #EEEEEE;
border-radius: 10px;
box-shadow: 0 4px 10px #EEEEEE;
color: #555555;
padding: 10px;
margin-bottom: 5px;
}
.PopularPosts .item-title {
clear: both
font: 14px Cambria,Georgia, sans-serif;
color: #2288BB;
font-weight: bold;
text-transform: uppercase;
text-align: center;
}
.PopularPosts .item-snippet {
display: none;
}
.widget .widget-item-control a img {
height: 18px;
width: 18px;
}
</style>
Step 4. Now search for this tag:
</body>
... and just above it, add this script:
<script type='text/javascript'>                  
function changeThumbSize(id,size){
var blogGadget = document.getElementById(id);
var replacement = blogGadget.innerHTML;
blogGadget.innerHTML = replacement.replace(/s72-c/g,"s"+size+"-c");
var thumbnails = blogGadget.getElementsByTagName("img");
for(var i=0;i&lt;thumbnails.length;i++){
thumbnails[i].width = size;
thumbnails[i].height = size;
}
}
changeThumbSize("PopularPosts1",210);                  
</script>
What I highlighted in red is the widget ID for the Popular Posts gadget. To change the thumbnail size for any of your blog widgets, first you need to find the gadget/widget ID and then add a line below this part:
changeThumbSize("PopularPosts1",210);
changeThumbSize("widget-ID-HERE",210);
 ... and replace widget-ID-HERE text with the ID of that widget/gadget.

Note: you won't see the changes if the widget has a class selector - for this you may need to change class with id and replace the dot "." symbol with "#" within the CSS...

If you don't know how to find the id of a particular widget, please check out this tutorial on How to Use Firebug to Design a Blogger blog.

Step 5. Finally, press the Save Template to save the changes. And that's it!

Minggu, 22 Desember 2013

How to Use Character Entities in CSS, HTML and JavaScript

Sometimes, when using scripts, we must write special characters like accents by using a special set of codes called character entities, however these don't always look good or we get a question mark or other strange symbols. Usually, this is solved if the character encoding is done right but the logic may not always work.

In Blogger, special characters most of the time appear correctly, but when it is about other services, like external files, things can get complicated.

For example, this usually looks good and when you click on this link, you should see the letters in the right way:
alert(" á é í ó ú  ☺ ✛ ❤ ");
If we are trying to use other method and we want to use this type of characters, sometimes we need to write them in a special format called escape sequence which is nothing but a backslash followed by a letter and a number in hexadecimal format. In the case of common characters or accents, it would be \x followed by two hex digits:
\xe1 is the letter á
\xe9 is the letter é
\xed is the letter í
\xf3 is the letter ó
\xfa is the letter ú
Other combinations generate special characters:
\n is a line break
\t is the tab character
\' is single quote
\" is double quote
\\ is a back slash
Or we can use \u followed by the Unicode character code expressed as four hexadecimal digits:
\u00e1 is the letter á
\u00e9 is the letter é
\u00ed is the letter í
\u00f3 is the letter ó
\u00fa is the letter ú
this will allow us to see correctly what we couldn't before if we were using some other services:
alert(" \u263a \u2764 \u271b ");
On this page you can find a comprehensive list of all the characters, both symbols and different alphabets.
Although rare characters are not often used in the CSS, there is a case when they are necessary as well, like when using the content property with the :after and :before pseudo-elements.

The same criteria applies there, but we only need to add a backslash followed by the four-digit hexadecimal code. For example:
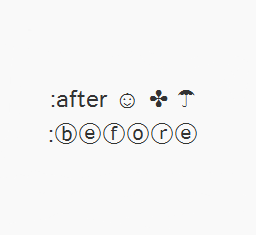
content: ":\24d1\24d4\24d5\24de\24e1\24d4";

content: ":after  \263a  \2724  \2602";
:ⓑⓔⓕⓞⓡⓔ
:after ☺ ✤ ☂

Remember that IE doesn't understand the :before pseudoclass with content, and you would have to set the list-style-type property as none, or you would get 2 bullets in CSS compliant browsers.

Selasa, 04 September 2012

How to Create Free Webpage Hit Counter using Javascript?

In this post I am gonna show you how to create your own free Webpage hit counter for your website. Many of newbies or website developer use hit counter available on internet provided by some website,But It slows down your page loading. Hit counter created using "localStorage" in javascript is far better than cookies or any ready made counter. Count will increase even if you close browser window and next time you refresh page

Copy the code given below into script tag and refresh the page to count:


if (localStorage.pagecount)
{
localStorage.pagecount=Number(localStorage.pagecount) +1;
}
else
{
localStorage.pagecount=1;
}
document.write("Visits: " + localStorage.pagecount + " time(s).");

If you want to count page view for session of your browsing you can use "sessionStorage". It will increase count until you close your browser.


Copy the code given below into script tag and refresh the page to count:


if (sessionStorage.clickcount)
{
sessionStorage.clickcount=Number(sessionStorage.clickcount)+1;
}
else
{
sessionStorage.clickcount=1;
}
document.write("You have clicked the button " +
sessionStorage.clickcount + " time(s) in this session.");

Was this Information helpful?

Yes No